3/13/2022 – I removed the shunt feed from the tower. The 80-m 4-square outperforms it in every way, and I believe that the shunt feed was detuning the 4-square in the NW-SE direction. Further, the 80-m dipole at 105 feet still performs very well.
2022-Feb NAQP RTTY
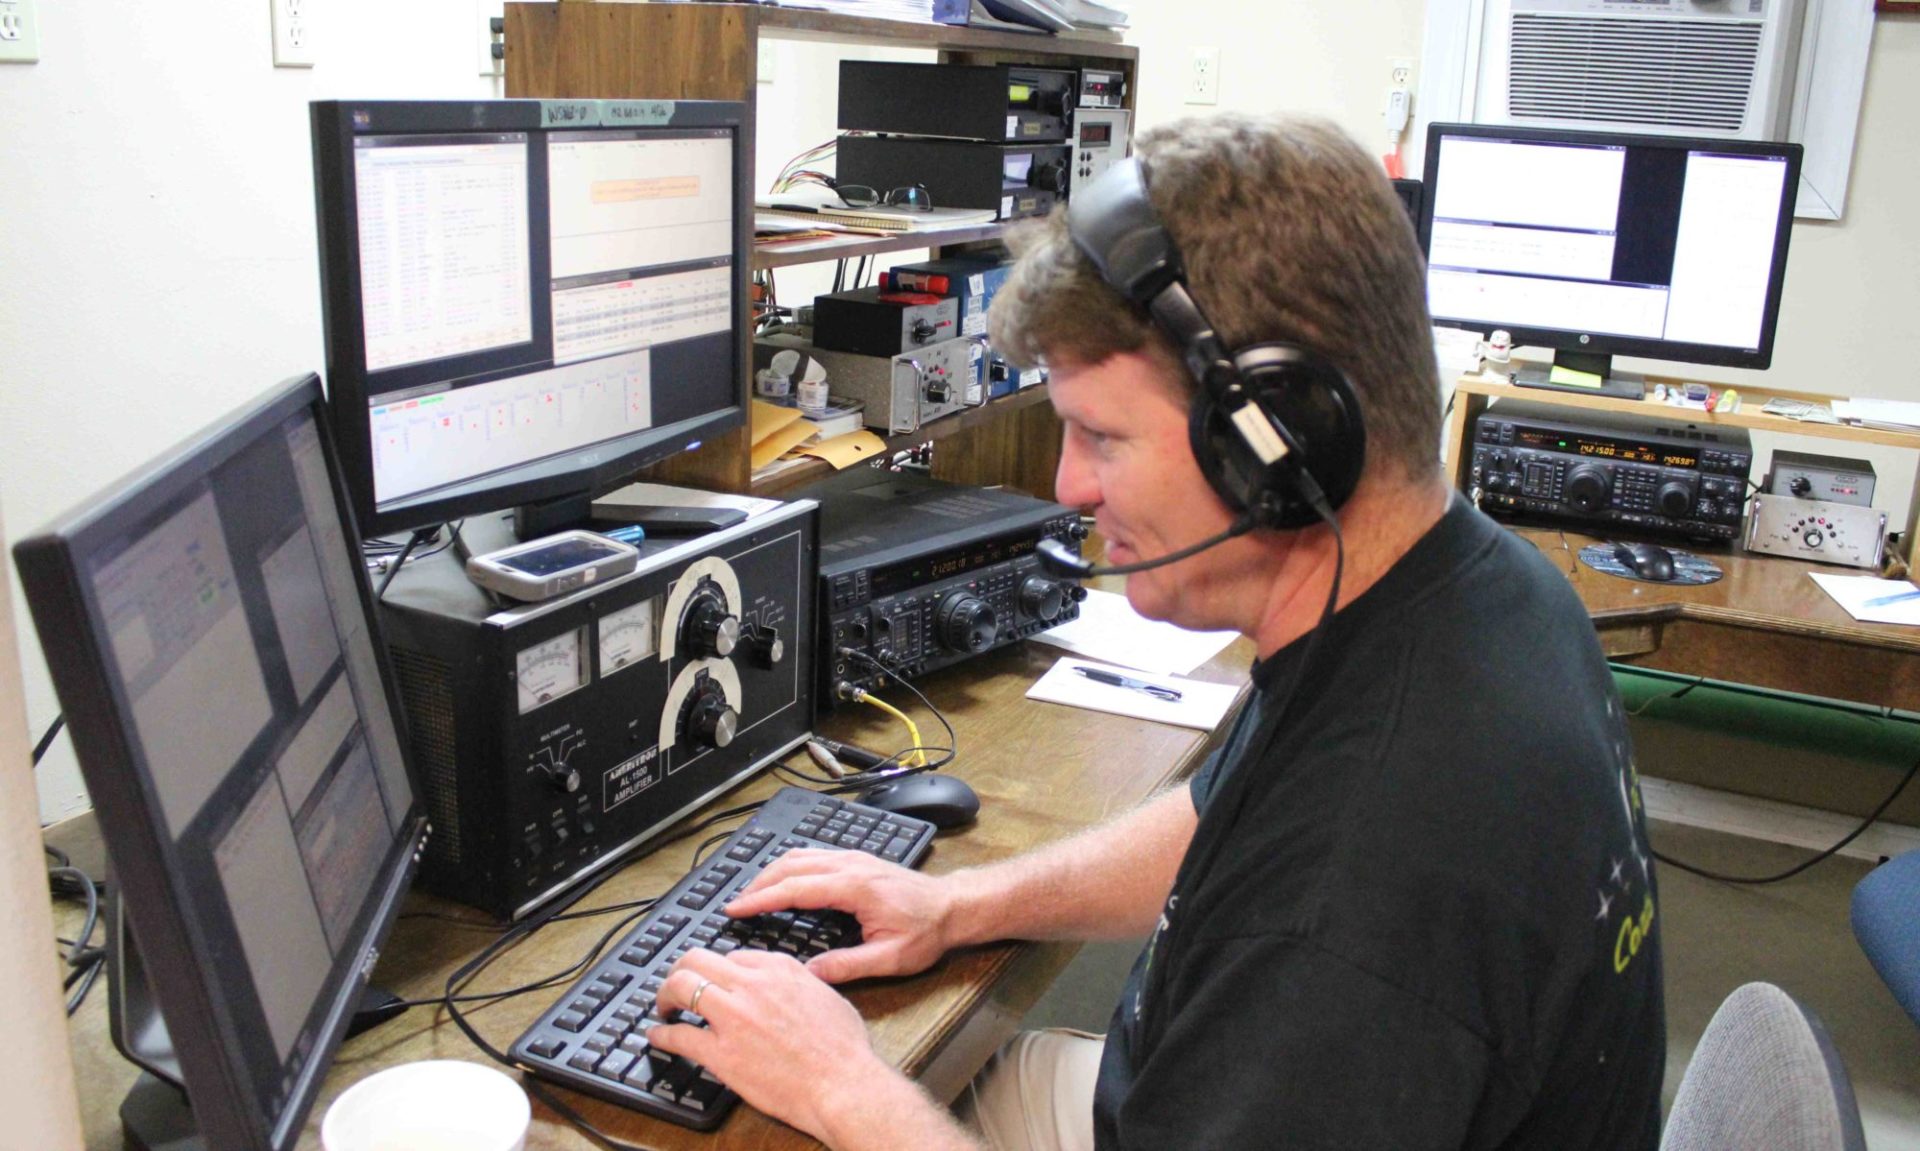
2/27/2022 @W5WZ – M/2, ops W5WZ, WM5H, KD5YS
We played well together and in the contest, with an apparrent 4th place finish.
During NAQP RTTY, SWR and RF PWR bargraph seemed weird. High SWR, low RF output. RF power set to 100 watts. Outboard LP-100A power meter showing SWR in normal range and power in normal range. As contest progressed, we noticed zero bars on SWR meter, and a single bar on RF meter. LP-100A was showing 100-126 watts, with normal SWR. After contest, connected a dummy load to the K3 Ant2 (easiest to do; normal antenna connected to Ant1) and the meter behaved the same. It was midnight, so didn’t do any other troubleshooting.
Within a day or two, got a support ticket open with Elecraft.
Maintainence – KT34M2
12/18/2021 — Checking out the KT34M2 in preparation of the NAQP series in January and February has revealed issues on all three bands.
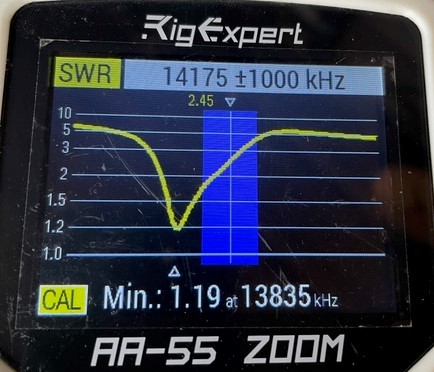
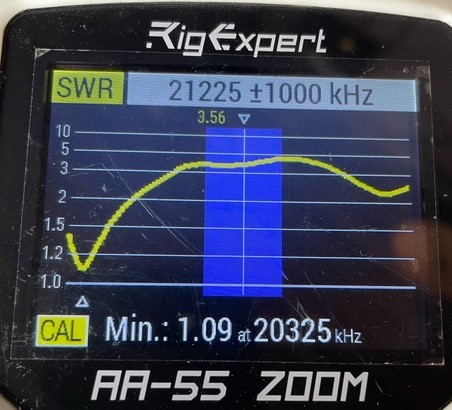
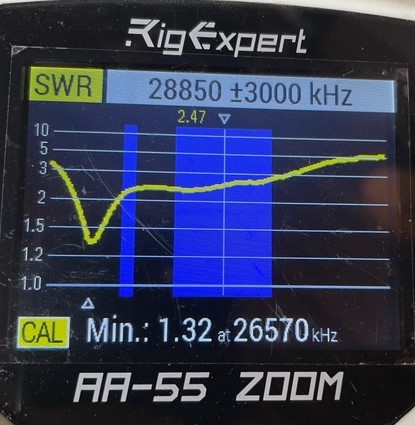
Some queries to TowerTalk and the responses all pointed toward bad coax/water in coax, or loose connections between balun and front driven element and/or rear-driven element. On 1/13/22, we tested the coax and even swapped with another run. Same symptoms. A call to M2 support; they suggested perhaps water in one or more of the capacitors. We tilted the tower over to access the capacitors. Removed all 16 end caps, finding no water. We did, however, find much insect debris and dirt dauber nests. Cleaned all that out with compressed air and a long rod to push through the 3/8″ inner tube. We also verified all the mechanical connections on the driven elements and confirmed good continuity with an ohmmeter. The SWR curves are improved, but still too low.
FT-1000MP at position D retired
After a decade of service, the FT-1000MP at position D has been retired and sold to KI5NKF. I purchased another (my third) K3 to replace it.
Tower Guy Tension – You do check it regularly?
All tower owners should regularly inspect their complete tower system – guys, guy anchors, guy wires, tower base, section bolts, turnbuckles, etc – the complete tower system. Before I climb, I visually check all I can see. When I climb, I check section bolts. And about once a year, I check guy tension and adjust as needed.
| 10 Feb 2021 | NW Guy | NE Guy | S Guy |
| Top 1/4″ | 29 | 29 | 28 |
| Mid 3/16″ | 19 | 18 | 18 |
| Bottom 3/16″ | 20 | 20 | 19 |
This process led to me emailing Tim W3YQ to ask his thoughts. Here is the reply:
Well, here’s my thoughts. Plumb is much more important than guy wire tension – within reason. To have a tower in plumb, the whole structure is in compression. It won’t fail. Just like a pencil – you can’t smash it with a downward force, but you can snap it by bending it in the middle.
I know of only two ways to plumb a tower. The first, best, and easiest is to set up two transits; 90 degrees apart. Sight both transits to the bottom of the tower then move up to the first guy level. Get the tower straight up to that point. I usually use the width of a Rohn tower leg as my “good enough” standard. If the tower’s way out of plumb, you might have to mess with the other two sets of guy wires simultaneously. Sometimes it’s really hard to pull that first guy wire set in when the rest of the tower is fighting you. Once the lowest set of guys is done, move up to the next set.
The tension of the three guy wires of any level will (almost) never be equal. The only time that would occur is if you were on a perfectly flat plane and your guy anchor points are exactly on the money. Theoretical but not practical. Someone who adjusts all three guy wires to equal tension almost certainly have a crocked tower. Don’t worry about guy tension. Go for plumb. Use the tension gauge to help you get things set “close” to the suggested tensions. Err on the side of loose instead of tight. That 10% rule is a guideline and it’s purpose is to prevent the guy wires from galloping. They’ll do that in the wind if they’re much too loose. Loose guy wires, again within reason, exert less force on the structure. Yes, when you climb, there will be a little more movement with loose guy wires, but the tower is not going to fall over. Too tight, on the other hand, is exerting an extreme downward force on the tower. True that if you’re perfectly in plumb it won’t collapse, but why go there. So just use your Loos gauge as a guide. Never go above the 10% value on any guy wire, but try to get close to that value on the one that needs the most tension. Then adjust the other two guy wires for plumb and not tension. I usually check the tension of all three and I generally find that they’re way off from each other. That’s OK.
The second method: It IS possible to plumb by attaching a small rope at each guy level, one at a time. Center it in tower, hang it down through the middle of the tower, and attach a weight at the bottom. Then stick a bucket of water for the weight to rest in. I guess you call that a plumb bob. The water keeps the weighted rope from swinging. It’s kind of a PITA, but it works.
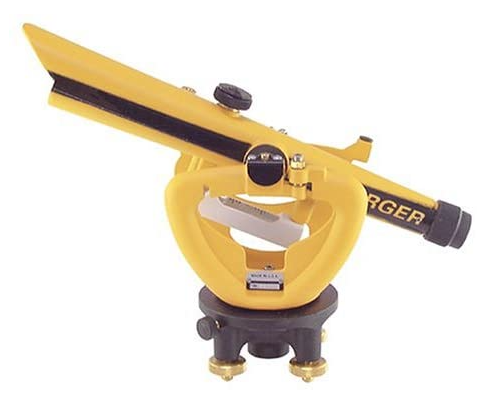
So, this led to me purchasing a transit and acquiring another to be able to properly do “Method One” above. Once all the components arrive, I’ll post an update on the project.
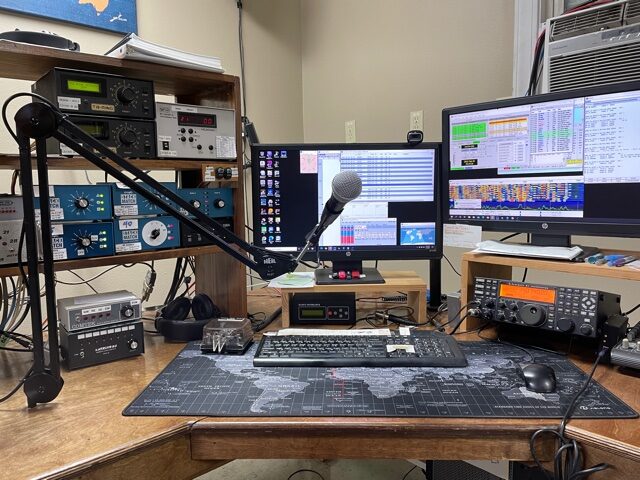
Boom + Microphone + Mount <$90
A year ago I wrote about my Christmas 2018 “self-gift”, the pair of JBL Control 2P powered monitor speakers that I integrated into my shack with a Mackie 1202-VLZ Pro. This continues to be enjoyed in my shack because I can listen to multiple sources without being tethered by a headset cord.
Similarly, I’ve been tethered by headset cord to all my microphones because they are all headset mikes. For some time, I had desired an articulating boom + microphone setup. However, I did not want to pay for brand new equipment just to try something out, and I wasn’t really sure how or where I would mount it to not be in the way when not using it.
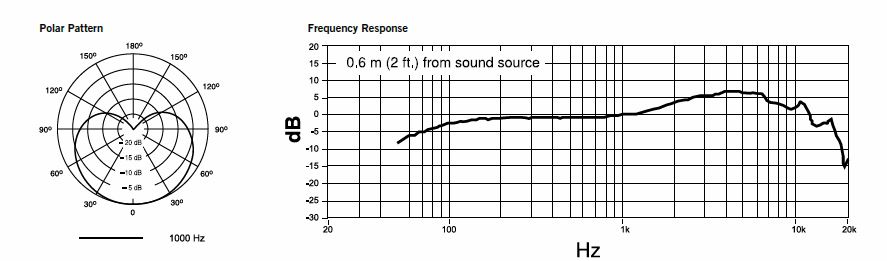
I had read on the Elecraft reflector some interesting commentary about brands of microphones. As the K3 has a built-in transmit equalizer, it seemed the consensus leaned away from the brand that is marketed as the elite microphones for ham radio. I studied some other brands and the frequency response and cardioid patterns of several microphones.
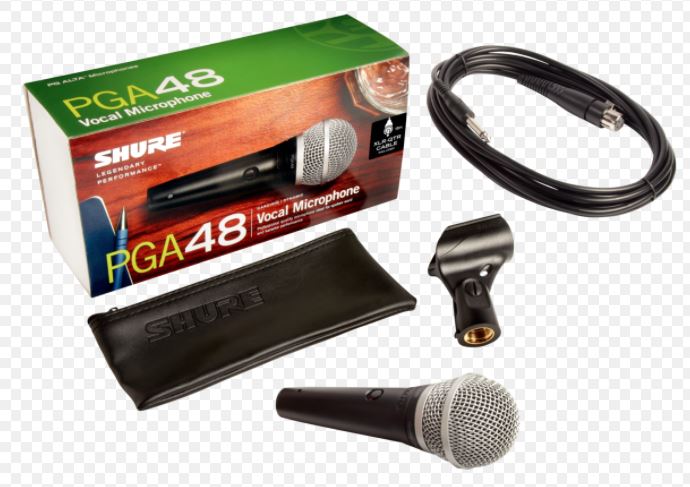
Soon, I found one that I was willing to buy and try. I found a new condition, open box Shure PGA48 with a 15-ft XLR cable and mic clip on eBay for $33 to my door.
At the same time on eBay, I found a used mic boom, Heil PL2 missing the cable covers and any type of mount, for $50 to my door. Tiny zip ties will hold the cable just fine.
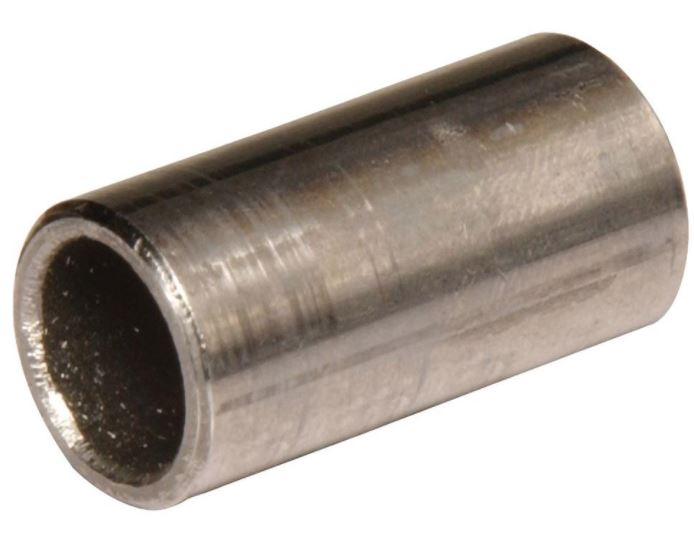
The items arrived, and I was left with figuring out a way to mount the boom. An ‘ah-ha’ moment struck, and a simple solution was found. My radio desk has a brace under the tabletop in just the right place. I drilled a 5/8″ hole through the tabletop and into the 2×4 brace for a total depth of 2 inches. After vacuuming the shavings out, I pressed a steel sleeve bushing O.D. 5/8″, I.D. 1/2″, Length 1-1/2″ ($3 at the local hardware store) into the hole, creating a flush-mount for the boom to sit in. It works perfectly!
Next was to listen to how I sounded with the existing TX EQ settings in the K3. I had a set of “rotating” TX macros set up to allow me to quickly step through five different TX EQ settings.
RAG-1 TE+06+06+00+06+00+04+08+12;MN110;SWT24;SWT21;SWT14;
RAG-2 TE+00+00+10+04+04+06+08+12;MN110;SWT27;SWT21;SWT14;
DX TE+00+00+00-06+00+04+08+12;MN110;SWT29;SWT21;SWT14;
VERY-DX TE-06-06+00-06+00+04+08+12;MN110;SWT33;SWT21;SWT14;
FLAT TE+00+00+00+00+00+00+00+00;MN110;SWT13;SWT21;SWT14;
After transmitting at 0.1 watts on 10m and listening via another K3 on a distant beverage antenna, I have settled on these as my initial settings for the new microphone:
SHURE TE-16-14-04+00+02+04+08+12;MN110;SWT34;SWT21;SWT14;
SHURE-DX TE-16-16-10-06+04+06+08+12;MN110;SWT32;SWT21;SWT14;
Yesterday afternoon, I enjoyed many casual QSOs on 17m and 20m using the completely “untethered” accessories. I even experimented with VOX and improved the settings to work effectively with the Shure mic.
Summary: This is a worthwhile purchase and it will enhance my casual operating enjoyment.
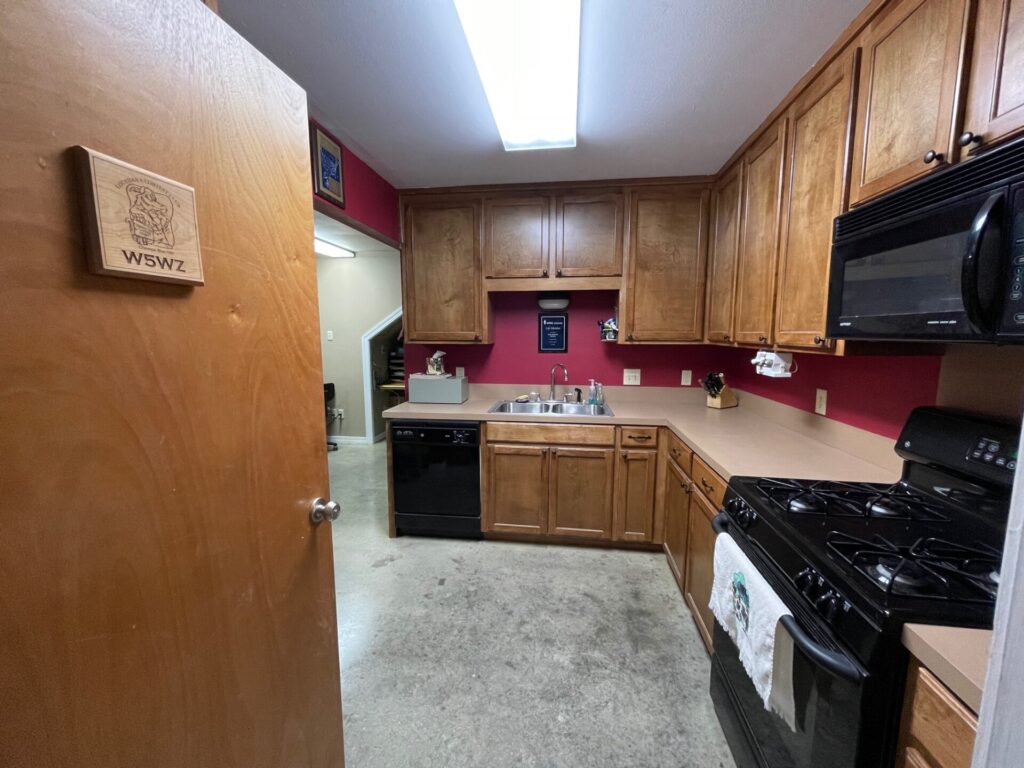
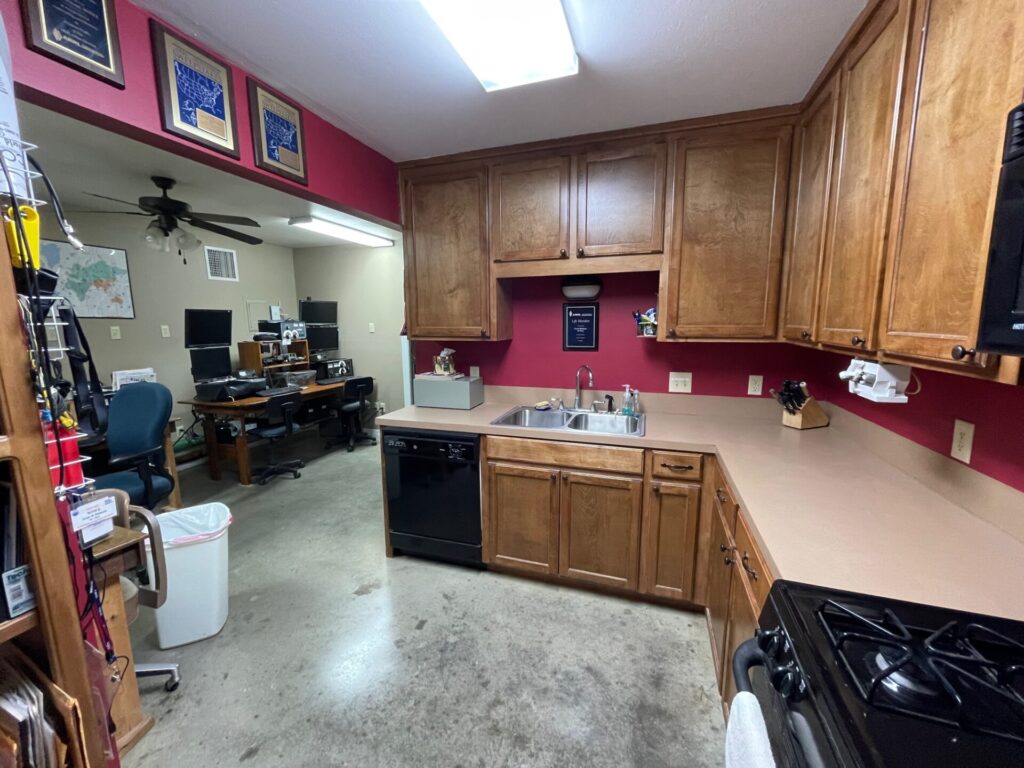
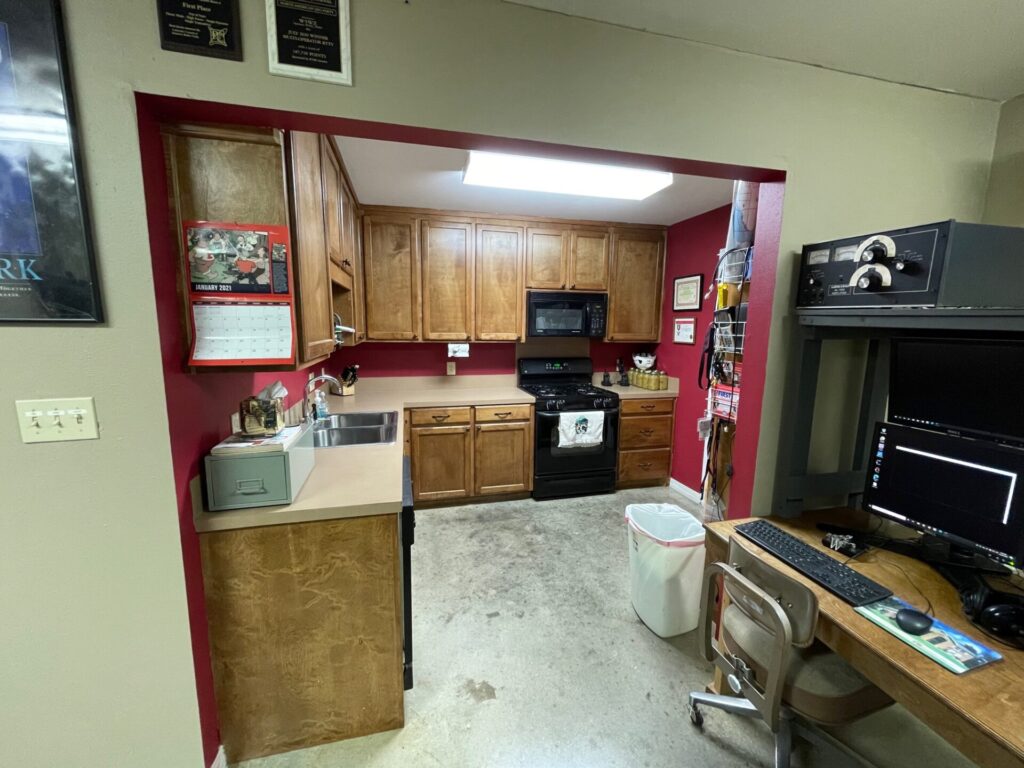
Fresh Paint!
In late October 2020, I realized that the paint in the shop, shack, kitchen and bathroom was now 10 years old, and had endured rearing 4 young children. It was time for fresh paint. But instead of exclusive flat white, I got courageous and asked for suggestions from my wife Sharon KW5MOM and my adult daughter Jordan KF5GDJ.
They both suggested adding some real color to the mix, which I gladly obliged. The results were far better than I could have anticipated, and I love the colors in the entire shack area. It’s actually hard to believe what a difference it made!
Finished the project with 4 coats of clear concrete sealer on the floor.
2020 Station Improvements
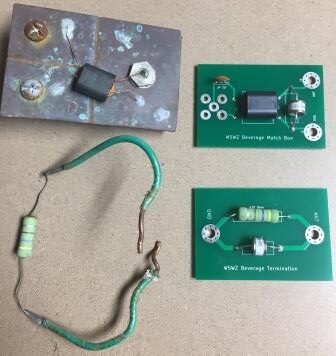
Added two new beverage receive antennae – southeast and southwest.
- Southeast is 580 feet long.
- Southwest is 480 feet long.
Installed them both 2 feet above the existing beverages for NE and NW using PVC pipe as a vertical standoff.
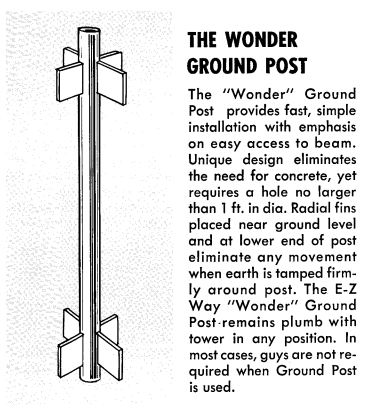
Built a home-brew EZ-Way Wonder Post to ground-mount the EZ-Way Tower that had been on my utility trailer as a portable tower. This 50-foot tower will be used for 6 meters, 2 meters, and 70 centimeters. I rebuilt a Ham-II rotator for this project.
- 6-meter antenna is a Hygain VB-66DX – 6 elements on a 24-foot boom.
- Don’t yet know what will go up for 2m and 70cm.
Implemented an EA4TX INTERLOCK to keep us honest in M/S and M/2 contesting.
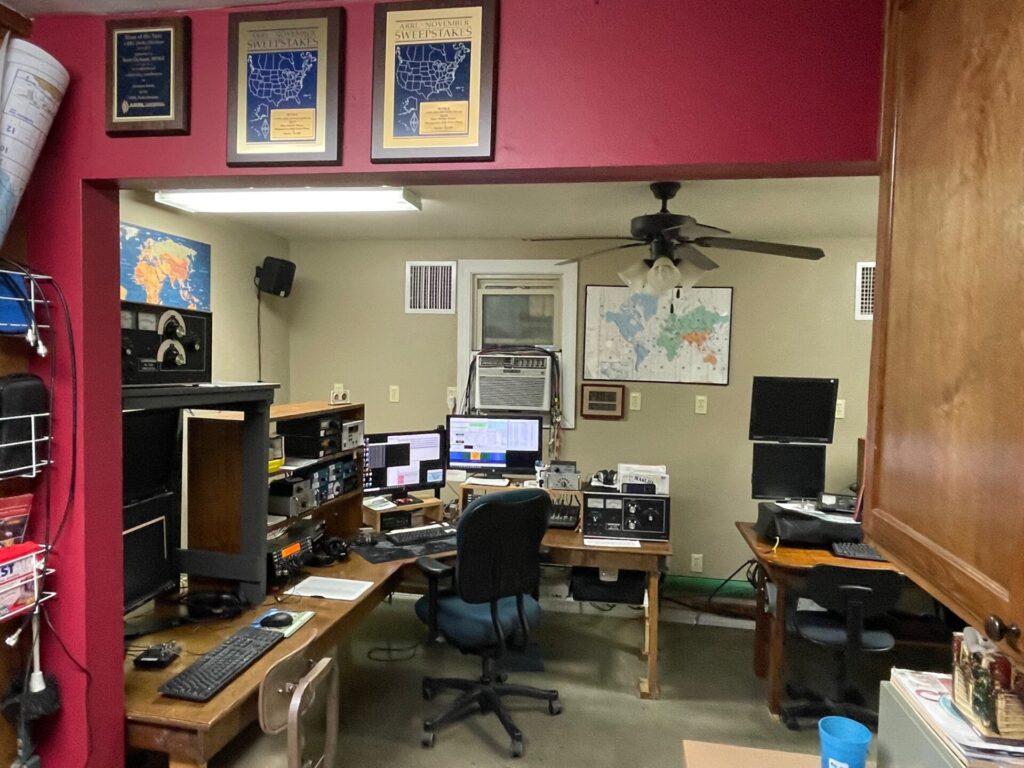
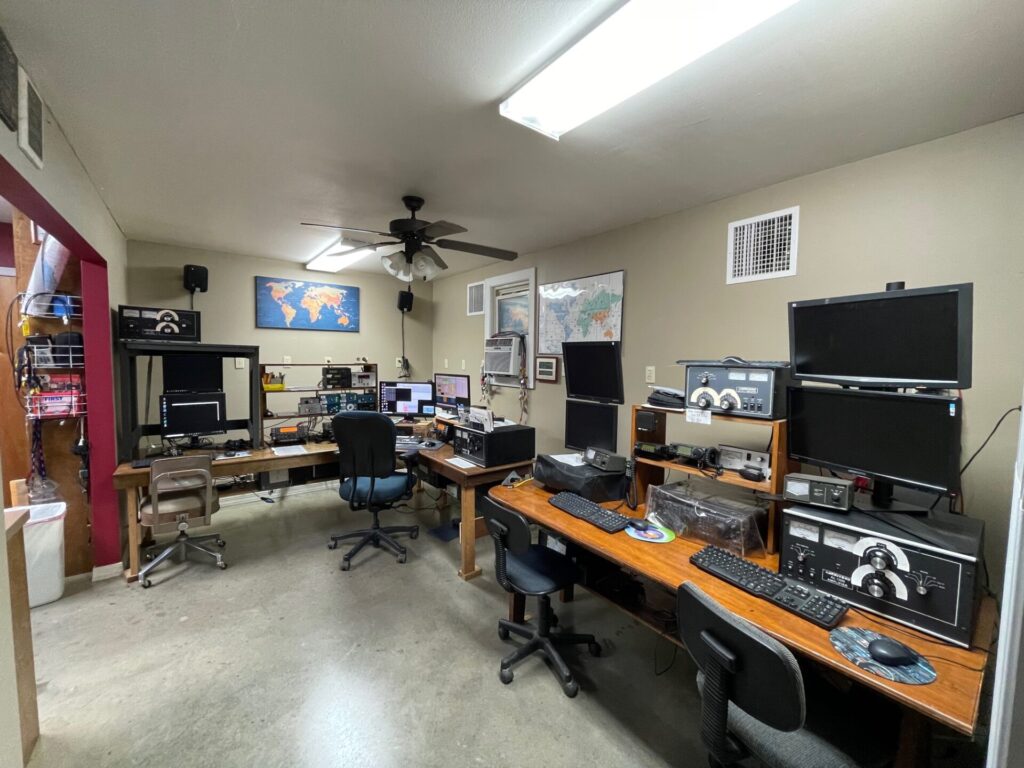
Remodeling the shack
After nearly 10 years, I decided to change the layout of the 3rd and 4th positions in the shack. The mult station had been under the stairs, the the 3rd station on a very small table. Additionally, all 4 computers were replaced. And I decided to identify the stations by letter, from left to right, rather than by number.
I’ve had a Mackie 1202-VLZ Pro sitting on a shelf for years. For Christmas 2018, I bought a gift for myself – a pair of powered JBL Control 2P monitor speakers, and integrated the mixer and the speakers into the shack. Connected the K3 at A, the K3 at B, and the computer at B (my main single op and “work” computer) to the mixer. This has really improved my enjoyment of shack time. I can listen the the bands without being tethered to headphones; I can listen to music from my computer; shack guests can hear the action; the list goes on. I’ve told some of my ham friends that this single change has had a bigger impact on my shack time enjoyment than anything else I’ve ever done!
At position A, I added a vertical dual monitor stand. The EA4TX interlock will sit on a shelf between position A and position B. The desk remains unchanged.
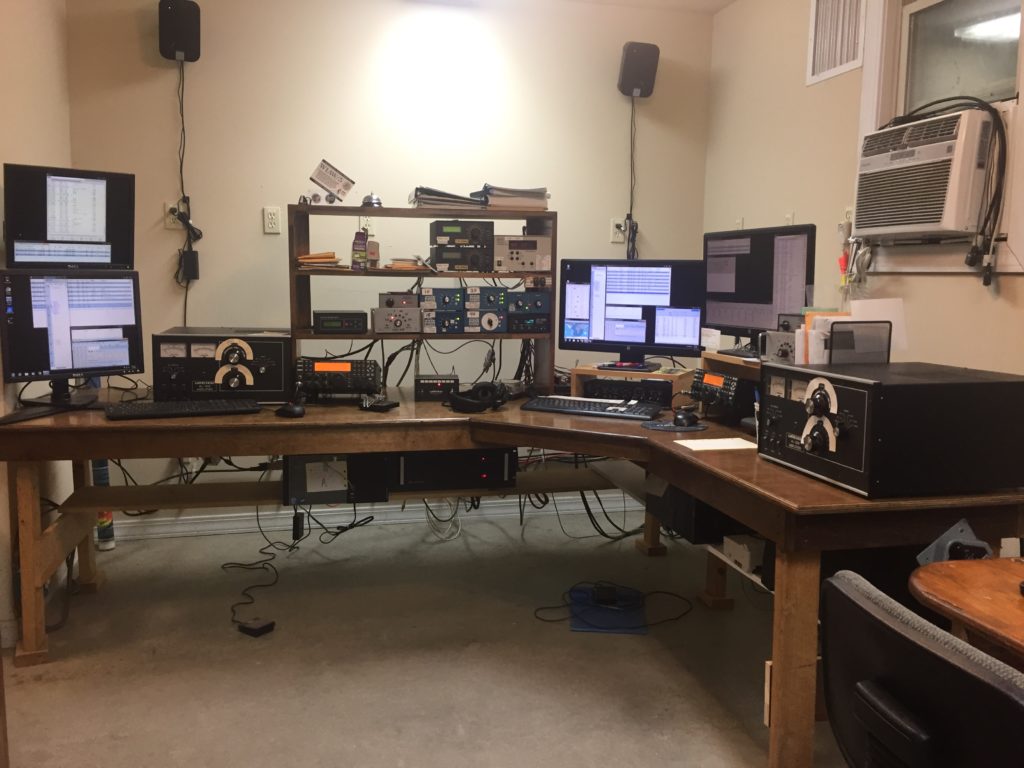
It was a different story at the other end of the shack. I had a desk that my father had built for me when I was in 4th grade. It was somewhat custom built for a old 19-inch black-and-white TV, my Commodore Vic 20 computer, and an Atari 2600. I replaced the table top when I became a ham, making it longer and deeper. A removable hutch on top was still functional. Letting go of some sentiment, I took the desk out of the shack, but kept the hutch to use on the table top under the stairs.
Several years ago, after I custom-built my L-shaped desk for A and B, my friend WW5RC (ex:KC5WA) had me build a nearly identical desk for him. He recently moved into a retirement apartment, and had to downsize. He offered me first refusal on the desk I built. So, with a modification to utilize what I needed, the desk built by me returned home for position C and position D.
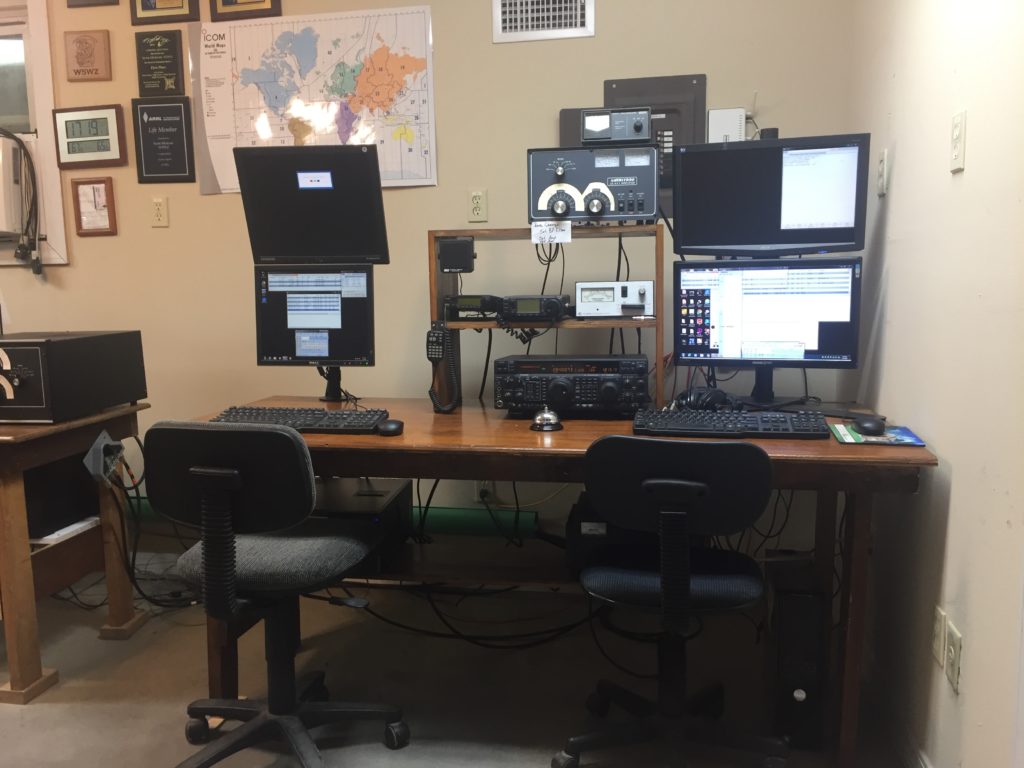
Dual vertical monitor stands were added, and new computers also installed. An Astron RS-70M supplies power.
I think the next remodel project will be to epoxy the floor- the bare concrete is constantly dusty and gritty.
Station Maintenance Oct 11 & 12, 2019
Over time, things up in the air change! I’d put together an ambitious to-do list!
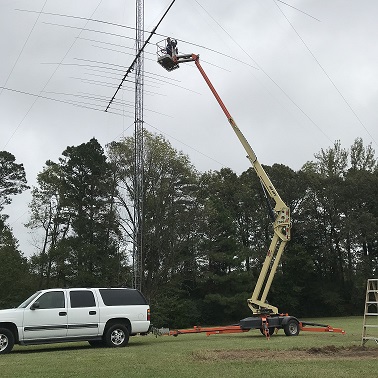
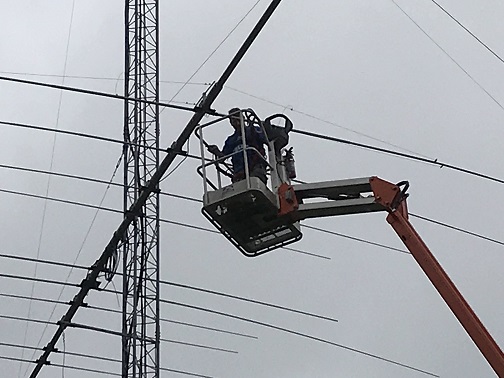
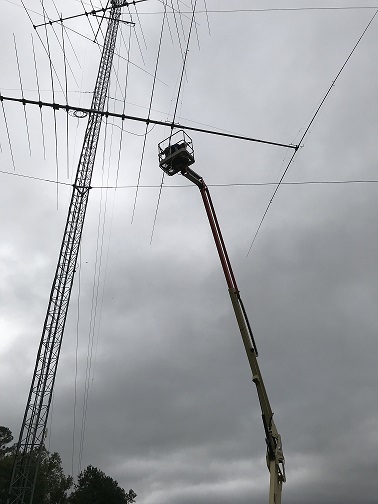
Bobby WM5H and I rented a 55-foot aerial lift, because the 40-meter feed point is 12 feet away from the tower. With Bobby as ground crew and Scott in the bucket, we were able to complete:
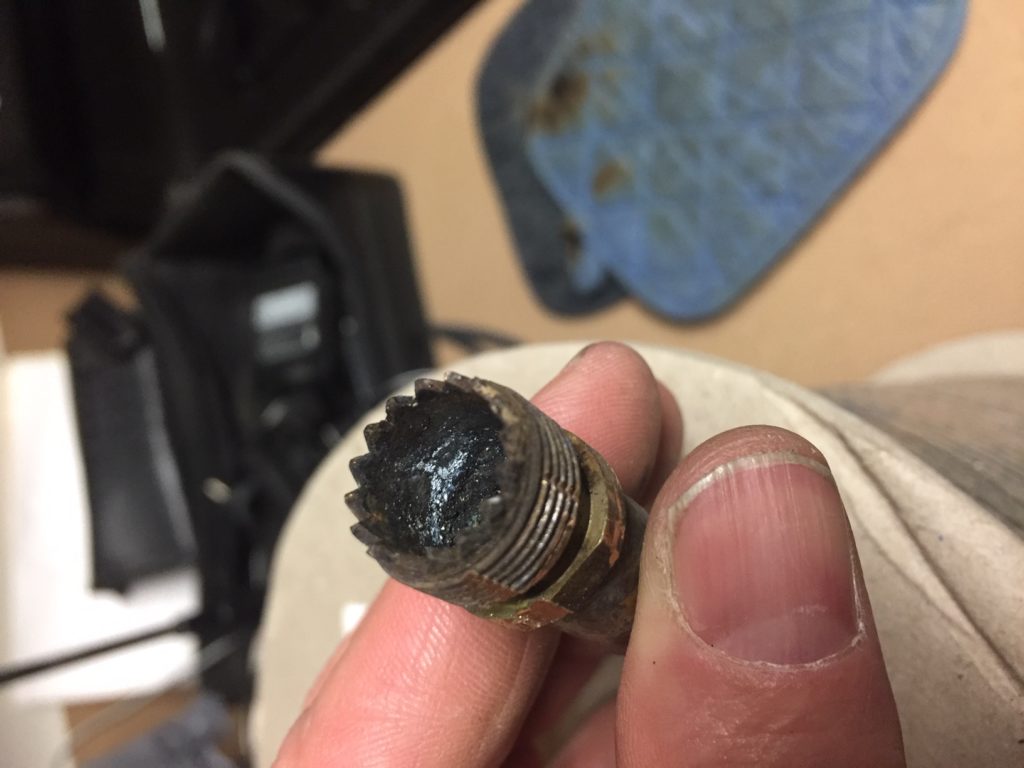
- Repair 40-meter Yagi at 52-feet above ground. Problem was a fried balun connector.
- Repair 15-meter Yagi at 52-feet above ground. Problem was loose hardware connecting hairpin to driven element.
- Use lift to rework 17-meter tower
-Add back stay.
-Secure new hard line and control cable to tower, leaving loop for tilt-over.
-Replace rotator loop feed line. - Use lift to cut down storm-damaged ash tree in sections. This was more of a chore than expected.
- Trim a large pine tree behind shop, strategically leaving limbs for easy wire antenna support. Installed a pulley at 55 feet above ground on a limb.
- Install new 580-foot beverage wire for SW direction
- Install new 580-foot beverage wire for SE direction
At the end of the second day, some items remain to be completed:
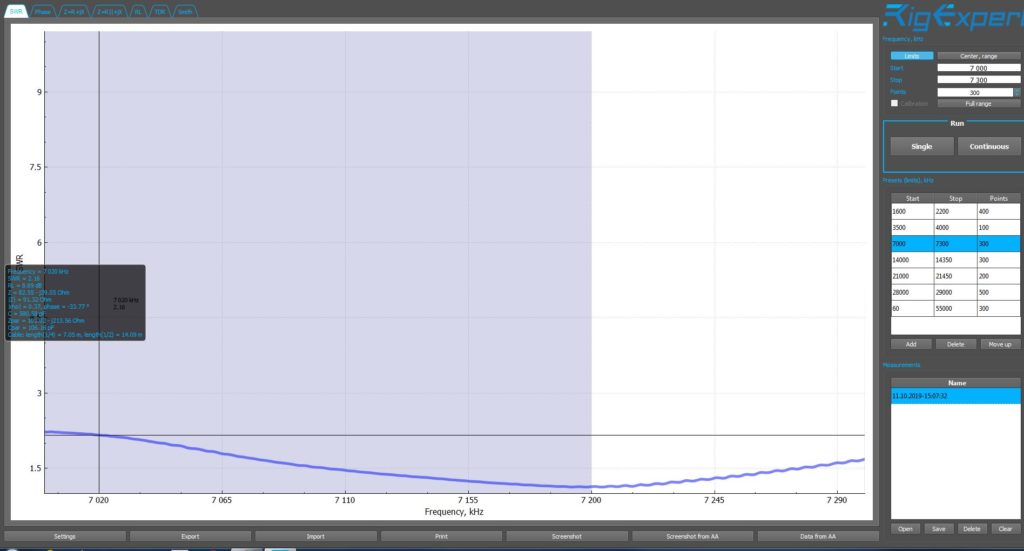
- Move 80-meter Inverted-Vee from 77-feet to 105-feet. Extend feed line as required. Tie out ends as required. Modeling by KA5M shows 1-dB gain increase at 20 degrees elevation; should be a worthwhile change.
- Build new 160-meter ground plane vertical with elevated radials in new location. Tie top support rope off near top of tower. Run hard line as feed line to new feed point.
- Re-arrange several wire antennas supported by trees. Replace string with new antenna rope.
- For the two new beverage antennas, run feed line on the ground. Drive 2 ground rods, install transformer and feed point termination.